Quality Guaranteed

Across the EU

Free Shipping

60€ in Germany | 100€ Europe*

Queer & Woman Owned

Founded 2017 in Berlin

chevron_left chevron_right

Filters

Clear all

Blog Themes

    Calathea Care Guide: How to Keep These Drama Queens Happy (And Why They're Worth It)

    by Plant Circle

    Calathea Care Guide: How to Keep These Drama Queens Happy (And Why They're Worth It)

    Let's be honest: Calatheas have a reputation. They're the high-maintenance friends of the plant world – gorgeous, captivating, and absolutely capable of throwing a tantrum if you look at them wrong. But here's the thing: once you understand what these tropical beauties actually need, they're not impossible. Just... particular. If you've ever fallen in love with those stunning patterned leaves only to watch them crisp up and curl within weeks, you're not alone. Calatheas (now technically called Goeppertia, but we'll get to that) are native to the Brazilian rainforest floor, and they have very specific opinions about their living conditions. But when you get it right? They're absolutely worth the effort. What Are Calatheas (And Why Did They Change the Name)? Calatheas are tropical plants from the Marantaceae family, known for their incredibly decorative foliage with patterns that look hand-painted. In 2012, botanists reclassified most Calatheas into the genus Goeppertia based on genetic research, but let's be real – everyone still calls them Calatheas, and that's fine. (Even we do it.) What makes them special? Beyond the stunning leaf patterns, Calatheas are nyctinastic, meaning their leaves move throughout the day in response to light. They fold up at night (called "praying") and open again in the morning. It's like having a plant that does yoga. Why Are Calatheas So Hard to Keep Alive? Here's the truth: Calatheas aren't hard because they're delicate – they're hard because most homes don't naturally provide rainforest conditions. In their native Brazilian habitat, they grow on the forest floor under a dense canopy, where it's: Consistently warm (18-27°C) Incredibly humid (60-80%) Shaded with filtered, indirect light Watered with soft, pure rainwater Growing in rich, well-draining organic soil Your Berlin apartment in winter? Probably dry, drafty, and lit by weak northern light. That's the challenge. But it's not impossible to bridge that gap. How Much Light Do Calatheas Need? This is where most people mess up. Calatheas need bright, indirect light – but what does that actually mean? Perfect light: A spot near an east or north-facing window where the plant gets plenty of ambient brightness but no direct sun rays hitting the leaves. Think "bright enough to read a book comfortably" but not "sunbeam on the floor." Too much light: Direct sun will scorch and fade those beautiful patterns. You'll see bleached, crispy leaf edges and washed-out colors. Too little light: The plant will survive but won't thrive. Growth slows, colors dull, and the leaves won't fully open or move as dramatically. Pro tip: If you only have bright windows, use a sheer curtain to diffuse the light. Calatheas can also do well under grow lights – aim for 10-12 hours of moderate-intensity LED light. What's the Deal with Calathea and Water? Water is where Calatheas get really picky. They want consistent moisture (not wet, not dry – moist) and they're sensitive to water quality. How Often to Water Calatheas Water when the top 2-3cm of soil feels dry to the touch. This usually means every 4-7 days in summer, less in winter. The key is consistency – they hate drying out completely, but they also hate sitting in soggy soil. Use your finger or a soil moisture checker to test before watering. If the soil feels damp below the surface, wait another day or two. What Kind of Water to Use Here's where it gets annoying: Calatheas are sensitive to tap water, especially hard water with high mineral content (looking at you, Berlin tap water). The fluoride, chlorine, and salts cause brown, crispy leaf tips and edges. Best water options: Rainwater (collect it if you can!) Distilled water Filtered water (Brita-style filters work) Tap water that's been left out overnight to off-gas chlorine Water temperature: Use room-temperature water. Cold water shocks the roots. How Do You Increase Humidity for Calatheas? This is THE most important factor for happy Calatheas. They need 60%+ humidity, and most homes sit around 30-40%, especially in winter with heating on. Humidity Solutions That Actually Work Best option: HumidifierA small humidifier near your plant shelf is the most effective solution. Run it daily, especially during heating season. Good option: Pebble trayPlace your pot on a tray filled with pebbles and water. As the water evaporates, it creates a humid microclimate. Just make sure the pot sits on the pebbles, not in the water. Okay option: Grouping plantsPlants transpire moisture, so grouping them together creates a more humid environment. It's not enough on its own, but it helps. Meh option: MistingMisting provides temporary humidity that lasts maybe 10 minutes. It's better than nothing, but don't rely on it as your only strategy. Plus, wet leaves can encourage fungal issues. What doesn't work: Putting them in the bathroomUnless your bathroom has a window with good light AND you shower multiple times a day, this won't provide consistent enough humidity. What Soil Do Calatheas Need? Calatheas need soil that retains moisture without becoming waterlogged – a tricky balance. Standard potting soil is usually too dense. Ideal Calathea soil mix: 50% quality potting soil 20% perlite or lava rocks for drainage 20% coco coir for moisture retention 10% worm castings or compost for nutrients Or save yourself the trouble and use our Calathea & Maranta Potting Mix, which is specifically formulated for these picky plants. The mix should be light, airy, and slightly acidic (pH 6.0-6.5). Good drainage is critical – Calatheas are prone to root rot if they sit in wet soil. How Do You Identify Different Calathea Varieties? There are dozens of Calathea varieties, each with distinctive leaf patterns. Here are some of the most popular: Calathea Roseopicta (Rose Painted Calathea) Large, round leaves with pink, cream, or purple patterns radiating from the center. Varieties include 'Dottie' (dark with pink outlines), 'Rosy' (pink centers), and 'Surprise Star' (cream and pink variegation). Calathea Zebrina Bold, dark green stripes on light green leaves that look exactly like zebra stripes. One of the most dramatic varieties. Shop Calathea Zebrina → Calathea Ornata (Pinstripe Calathea) Dark green leaves with thin pink or white pinstripes. The pink fades to white as the plant matures, which is normal (not a sign of stress). Calathea Lancifolia (Rattlesnake Plant) Long, narrow leaves with dark green spots along the edges and burgundy undersides. More tolerant than other Calatheas – a good beginner variety. Calathea Musaica (Network Calathea) Intricate mosaic pattern that looks like stained glass or a network of veins. Absolutely stunning and surprisingly resilient. Shop Calathea Musaica → Calathea White Fusion White, green, and purple variegated leaves with a watercolor effect. Absolutely gorgeous and absolutely the most dramatic of the bunch. Shop White Fusion → Calathea Majestica 'Whitestar' Long, lance-shaped leaves with bold white stripes. More upright growth habit than most Calatheas. Shop Whitestar → Do Calatheas Need Fertilizer? Yes, but gently. Calatheas are sensitive to fertilizer salts, so less is more. Fertilizing schedule: Spring/Summer (growing season): Every 4 weeks with diluted liquid fertilizer at half strength Fall/Winter (dormant period): Every 8 weeks or not at all Use a balanced fertilizer (like 10-10-10) or one formulated for foliage plants. Organic options like worm tea or diluted fish emulsion work well and are gentler on sensitive roots. Signs of over-fertilizing: Brown, crispy leaf tips and edges, salt buildup on soil surface, stunted growth. Why Are My Calathea Leaves Turning Brown? Brown edges and tips are the #1 Calathea complaint. Here's what causes it: Brown, Crispy Edges Cause: Low humidity, tap water with high minerals, or inconsistent watering. Fix: Increase humidity, switch to filtered/distilled water, and maintain consistent soil moisture. Brown Spots on Leaves Cause: Fungal or bacterial infection, often from water sitting on leaves or poor air circulation. Fix: Remove affected leaves, improve air circulation, avoid getting water on foliage, and reduce humidity slightly if it's excessive. Yellowing Leaves Cause: Overwatering, poor drainage, or root rot. Fix: Check roots for rot (mushy, black roots), repot in fresh soil if needed, and reduce watering frequency. Curling Leaves Cause: Underwatering or low humidity. Fix: Water more consistently and increase humidity immediately. Fading Patterns Cause: Too much direct light. Fix: Move to a shadier spot or filter the light with a sheer curtain. How Do You Propagate Calatheas? Unlike many houseplants, you can't propagate Calatheas from cuttings. They grow from rhizomes (underground stems), so the only way to propagate is by division. How to Divide Calatheas Remove the plant from its pot during repotting (spring is best) Gently shake off excess soil to expose the root system Look for natural divisions where the plant has multiple growth points Carefully separate sections, ensuring each has roots and at least 2-3 leaves Plant each division in fresh, appropriate soil mix Water lightly and keep humidity high while they establish Warning: Division is stressful for Calatheas. Only do it when the plant is healthy and actively growing, and expect some leaf loss during recovery. Are Calatheas Pet-Safe? Yes! Calatheas are non-toxic to cats, dogs, and humans. This makes them a great choice if you have curious pets who like to nibble on plants. That said, eating large quantities of any plant can cause mild stomach upset, so it's still best to keep them out of reach if your pets are particularly enthusiastic plant munchers. Common Calathea Pests Calatheas can attract spider mites, especially in low humidity. You'll notice fine webbing on leaves and tiny moving dots on the undersides. Treatment: Increase humidity immediately (spider mites hate moisture) Wipe leaves with a damp cloth to remove mites Spray with neem oil or insecticidal soap Isolate the plant to prevent spread Fungus gnats can also be an issue if the soil stays too wet. Use bio traps and allow the soil to dry out slightly between waterings. When and How to Repot Calatheas Repot every 1-2 years in spring when the plant becomes rootbound. Calatheas don't mind being slightly rootbound, so don't rush to upsize. Signs it's time to repot: Roots growing out of drainage holes Water running straight through without being absorbed Plant drying out much faster than usual Visible roots circling the soil surface Repotting tips: Only go up one pot size (2-5cm larger in diameter) Use fresh Calathea-specific soil mix Water lightly after repotting and keep humidity high Expect some stress and leaf loss – this is normal Are Calatheas Worth the Effort? Look, we're not going to lie to you: Calatheas are high-maintenance. They require attention, the right conditions, and a bit of trial and error to figure out what works in your specific space. But when you get it right? When those leaves unfurl with perfect patterns, when they fold up at night like they're saying goodnight, when you walk past and catch that burgundy underside catching the light? Absolutely worth it. They're not beginner plants, but they're not impossible either. If you can provide consistent humidity, filtered water, and indirect light, you can keep a Calathea happy. Start with a more forgiving variety like Lancifolia or Musaica, learn what works, and then graduate to the drama queens like White Fusion. In the end is it better to have loved and lost or to have never loved a calathea at all? Ready to take on the challenge? Browse our Calathea collection and find your perfect patterned plant. We ship across the EU with expert packaging, and every plant comes with care instructions to set you up for success. Happy plant parenting, and may your Calathea leaves stay crispy-free! 🌿✨

    Read more

    Ferns: Are They Really So Hard to Grow?

    by Plant Circle

    Ferns: Are They Really So Hard to Grow?

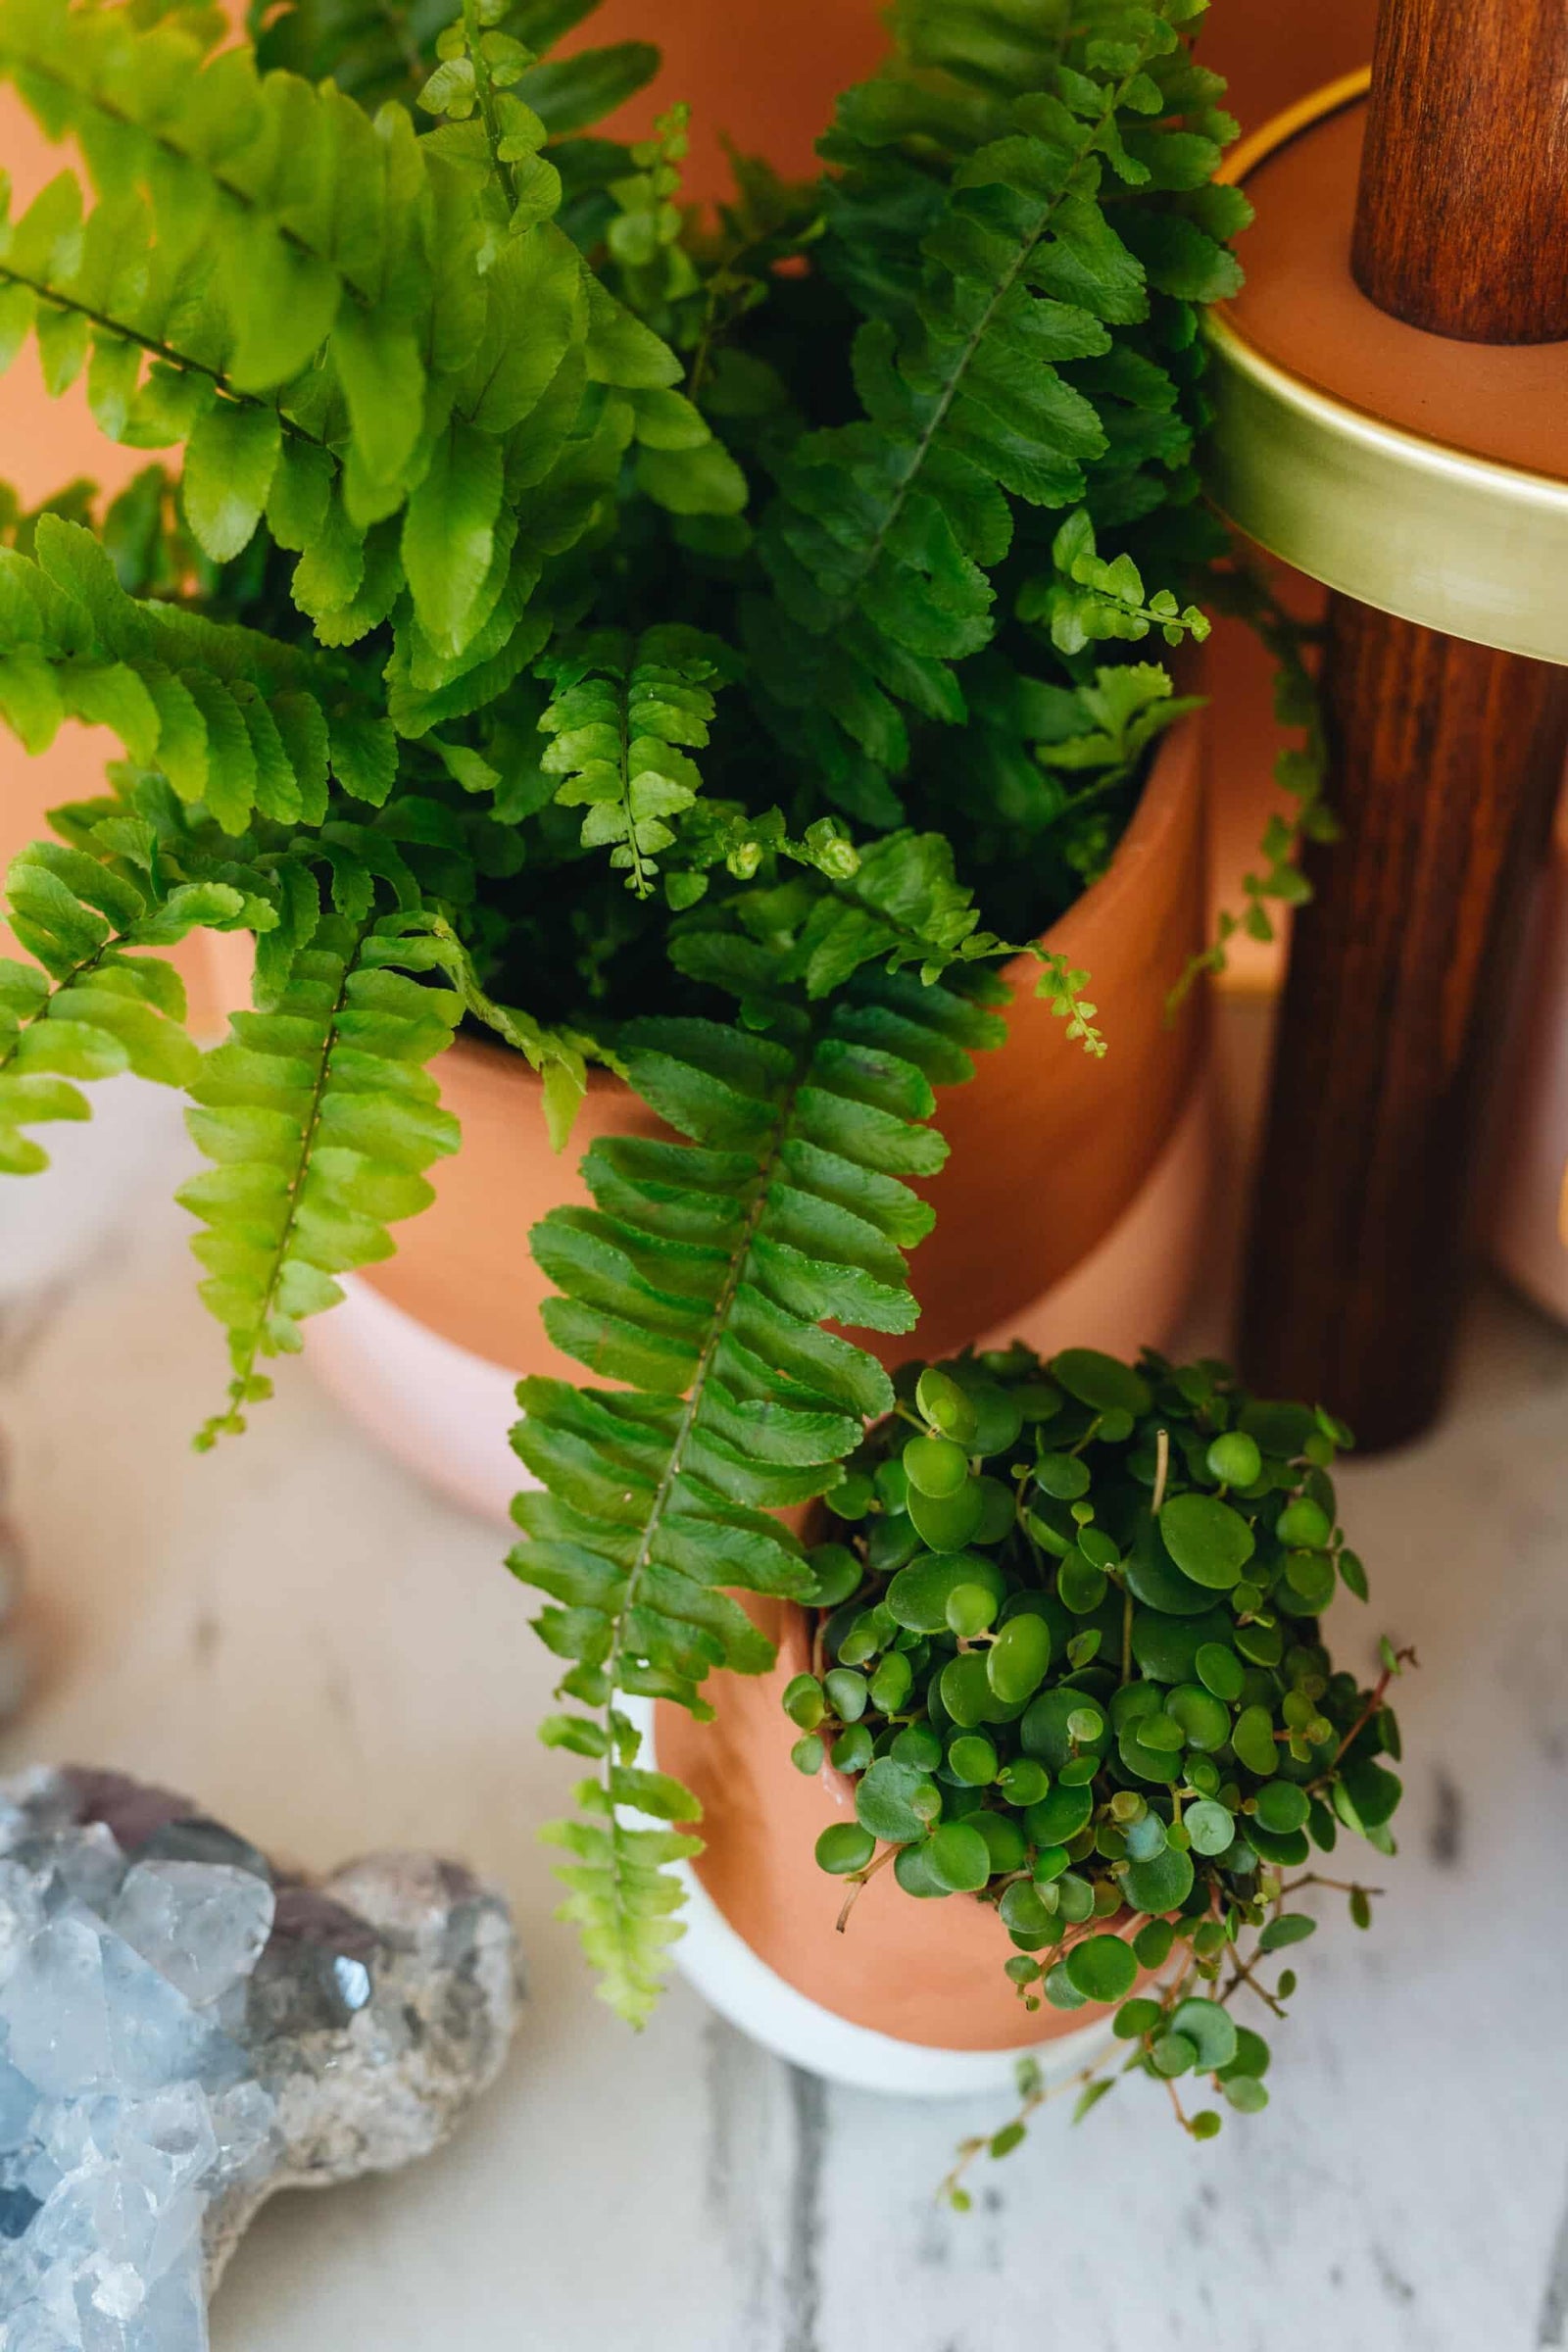
    Have you ever found yourself grabbing a stunning silver blue fern or a bushy Boston fern at the store, only to put it back when you remember how many times you’ve accidentally killed your previous ferns? We’ve all been there. I can’t count on the fingers of both hands how many ferns I’ve brought home only to watch them wither away. However, after some trials and errors, I’ve figured out how to grow them successfully and even discovered which varieties are hardy and thrive on neglect. Here are my best tips and findings to help you care for your ferns. Watering You might have heard the famous advice: “Keep moist but not waterlogged.” But what does that really mean? Essentially, it means that when you touch the potting mix, it shouldn’t feel dry, but it also shouldn’t be muddy. Think of it as watering more often with small amounts of water rather than a lot of water once a week. Here are a few things to consider: Planter Type: Avoid terracotta pots as they absorb moisture and dry out the soil faster. Unless you enjoy daily plant care, opt for a plastic nursery pot placed inside a decorative planter. This setup helps maintain moisture levels. Drainage: Ensure your planter has proper drainage. If you overwater your fern, you’ll notice water sitting at the bottom of the planter. Ferns dislike “wet feet” (unlike some plants like Alocasia) and can develop root rot if left in standing water. Water Quality: Use distilled or filtered water, or even rainwater if possible. This helps avoid any issues with the chemicals present in tap water. Soil One crucial step for fern care is to repot your fern as soon as you bring it home. Most store-bought ferns are pot-bound, and upgrading their soil can make a big difference. Here’s how to handle it: Fern Potting Mix 5L Pre-Repotting Soak: Generously water the plant and let it soak to loosen the root ball, making repotting easier and ensuring that the roots are more pliable, reducing the risk of damage during the repotting process. Soil Choice: Since ferns like to stay moist, a good potting mix would be coco coir with perlite and some peat to lower pH. Coco coir is known to retain moisture for longer periods, making it an excellent choice for ferns. A quick Google search based on the specific fern you have will guide you to the best soil type. Light While ferns don’t like direct sunlight, they still need a good amount of light to thrive. Please don’t place your ferns in dark corners or windowless bathrooms. The more light they get (without direct sunlight), the better they’ll grow. Humidity If your bathroom happens to have a window, it will be a great spot for your fern as they love higher humidity. Otherwise, speaking from experience, I had no problems with ferns in my Berlin apartment with average humidity. Recommended Ferns for Beginners For those new to growing ferns, I recommend starting with these varieties: Bird’s Nest Fern: Hardy fern that doesn’t mind if you forget to water it occasionally. It’s broad, arching fronds can add a lush, tropical feel to any indoor space, making it an ideal houseplant for those looking to bring a touch of greenery into their home. This fern thrives in indirect light and can tolerate low-light conditions, making it perfect for rooms without much natural sunlight. Additionally, it can help purify the air, contributing to a healthier living environment. Just make sure to keep its soil slightly moist and avoid letting water sit in the crown, as this can cause rot. Crocodile Fern: Super easy to grow and possibly the hardest fern to kill—as long as you don’t overwater it! It tolerates drying out between waterings quite well. This unique fern, with its rugged, crocodile-like textured leaves, makes for an attractive indoor plant. Additionally, it thrives in indirect light and is exceptionally adaptable to various environments. Whether you’re a beginner or an experienced gardener, the Crocodile Fern is a delightful addition to your plant collection due to its resilience and low-maintenance nature. Boston Fern: This guy is definitely next level, but if you repot it and keep it far away from touch with enough space around it in a well-lit spot, it will grow like crazy! Additionally, it’s important to keep the soil consistently moist but not waterlogged, as Boston Ferns thrive in high humidity. Regular misting and placing a humidifier nearby can also aid its growth. Don’t forget to feed it with a balanced, water-soluble fertilizer every month during the growing season to ensure it receives all the necessary nutrients. With just a bit of care and attention, you’ll have a lush, thriving fern that adds a touch of natural beauty to any space. Asparagus Fern: Probably my favorite! This one definitely prefers regular watering and doesn’t like to be dry, but in my experience, it won’t die quickly if you ever water it a day late. Its delicate, feathery foliage adds a touch of elegance to any space, and it’s relatively forgiving when it comes to lighting conditions. Although it thrives in bright, indirect light, it can tolerate lower light levels, making it a versatile choice for various rooms in your home. Growing it near humidifier will help maintain its lush appearance and prevent the leaves from drying out, which is particularly helpful if you live in a dry climate or during colder months when indoor heating can reduce humidity levels. By following these tips, you can turn your home into a fern-friendly haven. Happy growing!Monika Like what you read? Why not sign up for our newsletter and never miss a blog post? Our Instagram is also a great place for plant care tips. Have a request about topics we should cover? Email monika@plantcircle.co with your suggestions! Disclaimer: This blog post is written from a well-lit Berlin apartment; please keep that in mind. If you live in a different part of the world, growing ferns at home might be easier or harder. Read about some of our other answers to some beginner house plant question here.

    Read more

    Introducing: Huperzia

    by Plant Circle

    Introducing: Huperzia

    An intro to the mysterious and controversial Huperzias, and Oliver’s top tips on how to care for them! If you’re trying to claim the title of the most plant obsessed person you know, nothing beats getting involved with the hot topic that is the Lycopodiaceae family! Even that simple sentence could stir up some serious drama in the taxonomy world, as this family has been highly contentious when it comes to classifications. Most commonly known as Clubmoss, these plants are ironically not moss at all, and in fact have a striking resemblance to fir trees, so some people also call them Ground Pines. We could go on and on covering the intrigue and drama surrounding the more than 400 species in this family, but since this is merely an introduction, we have decided to let you geek out and do some digging yourself… you have to earn the label ‘plant obsessed’ after all! But what we will do is give you the inside scoop on one genus of this family: the Huperzia. Huperzia has many of the same characteristics of other species of Lycopodiaceae: a fir tree-like leaf shape, dichotomous stem branching, and flowers/spores, which are called strobili. Most specimens are found in alpine regions with temperate environments, meaning they thrive in quite a unique ecosystem, that is rarely found in your average apartment! These environments often experience heavy fog, rain, and mist, and this fact is important to consider when trying to grow your Huperzia indoors. High humidity is important, as well as constant moisture in the substrate, which should be representative of those same alpine regions. These environmental needs obviously makes caring for a Huperzia a more difficult task than with other houseplants, so how exactly are you supposed to replicate the natural environment of sub-tropical alpine Asia in your own bedroom? Well, the answer is quite simple, but it does involve a certain level of dedication to the cause! Firstly, research! Understanding this plant is an important part of being able to care for it. Your research will probably lead you down a trail of confusing information, but understanding the mystery of these plants will help you understand the importance of their care. However, if you can’t be bothered spending your free time dredging through the difficult to find, and often conflicting, information about a plant family that has dozens of different names, then just skip it, and listen here: Water your Huperzia regularly. And by regularly we’re actually talking multiple times per week, and in the peak of summer it could even be daily. Ideally you want to make sure there is always moisture in the substrate. The Huperzia should be planted in a coco-chunk-like substrate which doesn’t hold water as well as a soil mix. Learning to feel the subtle weight difference between a watered and unwatered plant is of the utmost importance. Medium to high humidity will protect delicate Huperzia leaves from browning, and seeing as you are going to be watering the plant so regularly, watering the entire plant in the shower would be a great way to keep the leaves from drying out. Additionally, a humidifier, or grouping your Huperzia with other plants, can be helpful. Keep your Huperzia in a bright, well lit area with exposure to a few hours of morning sun, if possible. Midday and afternoon sun will burn your Huperzia dreams to dust, but a little morning sun will give you and your beloved Huperzia some time to relax and daydream about being 1/10th of the way up a beautiful Himalayan Mountain from the comfort of your inner-city dwelling! So, now that you’ve followed these care tips, your Huperzia is lush, and has branched several times, an indicator of age, and has begun to develop spores. At this point you’re probably thinking ‘’wow, lucky me, new plant babies!’… well, think again, budding Huperzia heads! Germination of spores takes between three and eight years, and if you are thinking about propagation, well, that’s just as difficult. In conclusion, the Huperzia is a true plant baby in an almost literal sense, meaning it’s all yours, and you will have trouble sharing it with other plant parents. So instead we recommend that you just cherish it, get to know it, love it, and it will love you back!

    Read more

    Plant Circle investigates: Stephania erecta

    by Plant Circle

    Plant Circle investigates: Stephania erecta

    Exposed: Every single Stephania erecta on the European market is a poached plant! Stephania erecta has been trending in the houseplant community for the past one and a half years. These potato-like, tuberous plants with delicate round leaves have a special aesthetic that appeals to many plant enthusiasts, not only because they make for great pictures on social media, but also because their distinctive look sets them apart from a lot of other houseplants on the market. The hype around Stephania led wholesalers to source this peculiar plant for the European market and culminated in the sale of probably thousands of them in the last year. However, both experts and sellers now agree that it is most likely all of them were collected from the wild. “They are probably all poached,” says Rogier van Vugt, Head of Greenhouse at the Botanical Gardens in Leiden, Netherlands According to him, the wholesalers were “seemingly misled by the Thai sellers who told them all these plants were cultivated. However, one quick glance at the plants makes it clear they are not.” Plant poaching is the removal of plants from their natural habitat. In the case of Stephania, it is not illegal for the local sellers in Thailand to collect the caudex plants by detaching them from the limestones or digging them out of the forest floor, since they are not endangered. However, the plant community generally deems it unethical to buy or sell plants that have been ripped out of nature, as opposed to having been cultivated professionally at a nursery, mainly due to the detrimental long-term effects poaching can have on the population of certain species. A lot of the Stephania on the European market come from Dutch wholesaler Ansu. “Last year, we and our Thai partner Suphachadiwong saw that there was demand for rare plants on the market,” says Steef van Adrichem, Commercial Director at Ansu. “We found the caudex family interesting enough to give it a try.” With this move, the company decided not only to bring Stephania erecta to market, but also rarer caudex plants such as Stephania kaweesakii or Impatiens phengklaii, which were sold on to plant shops and consequently to house plant enthusiasts around Europe. “Stephania erecta is kind of a weed in some places,” van Adrichem says, “and it does not harm the environment when you take some out”.Still, van Adrichem acknowledges that the poaching of other caudex plants, which his company imported to Europe, might have had more detrimental effects. “We do not buy Impatiens phengklaii anymore,” he continues. “We also stopped importing Stephania kaweesakii after finding out how they take them from nature.”Ansu now strives to grow their own seedlings instead, in order to ethically cultivate these two rarer species. For this reason, Ansu is collaborating with Rogier van Vugt, who has been conducting research on the cultivation of Stephania and Impatiens.“I’m working on investigating how some of these caudex plants can be propagated by seed,” van Vugt says. “I urged Steef [van Adrichem of Ansu] to ask people in Thailand to do the same.” His experiments have yielded the first results in the form of Stephania erecta and kaweesakii seedlings. “Stephania seeds germinate very easily. It will be interesting to see how fast these will develop a desired caudex size. But I’m sure this will take years.”And therein lies the problem, as Stephania grow very slowly in their natural habitat, which is one of the challenges growers face when trying to cultivate them for profit. “Many Stephania like the popular S. erecta are lithophytes meaning they grow on rocks or, more specifically, limestone in this case,” says Stefan Burger, an Australian naturalist, habitat guide, and expert on cacti and succulents. “It takes them decades to mature and reach just a few inches in diameter. Under more favourable circumstances, like subtropical climates and nutritious substrates, they can grow quite fast and the caudex may reach a few inches in diameter in only a couple of years,” Burger explains. But the ever-changing houseplant market and drive for new plants often does not allow for such a large timeframe. New, trendy plants need to be saleable as quickly as possible – ideally in a good size and at an accessible price. “Even though they may grow fast under good circumstances, habitat poaching is the quicker and cheaper alternative for those living near to the native habitats,” says Burger. While there are no studies on the consequences of Stephania’s rise to popularity and mass poaching so far, it is clear that the harvest of thousands of bulbs in recent years has diminished their population quite a bit. According to Burger, there is no information on “these specific habitats, but we know that it is obviously having a negative effect“. While all Stephania were traditionally harvested from habitat, according to Burger, some growers have now begun cultivating them professionally. However, this remains a rare practice. In their home country of Thailand, Stephania suberosa in particular are commonly sold in Asian markets for home decoration and medicinal purposes. A few species of Stephania are toxic, while others are part of the Asian cuisine. The leaves of Stephania japonica, for instance, are commonly used to produce edible green grass jelly in Indonesia. “It all comes down to whether the Stephania are ethically grown or not,” Burger says. “Plants should only be bought from a CITES-approved nursery for 100% peace of mind.” The Convention on International Trade in Endangered Species of Wild Fauna and Flora (CITES) regulates the global trade in plants. It categorises endangered plants into three categories, depending on the level of threat they are under. It lists more than 30,000 taxa of plants compared to about 5,000 taxa of animals. Stephanias are not on the CITES list as of now.“Any plants sold via social media direct messages should be treated with suspicion,” Burger says. He strives to educate plant enthusiasts about illegal plant poaching and importing via his Instagram @cactusexplorer_.He also runs cactus exploration tours in South America, where cactus and succulent poaching is of particular concern. Rogier van Vugt suggests sellers should be more mindful when selling slow-growing caudex plants, such as Stephania. “The plant market should at least stop advertising these plants as a funny, disposable, cheap plant,“ he says.“This way people will have to think a bit more before they buy one. This will limit the demand in numbers, yet can still supply the people in Thailand with an income. Logically, this can only be done with common species.” Thanks to everyone who generously gave us their time and expertise, so we could put together this article, and to Plant Circle’s Sarah for doing the investigating.If you are one of the people who have been wondering why we haven’t restocked Stephania erecta in ages, now you know that as soon as the reality of where these plants come from came to our attention we stopped selling them in our shop immediately. It is our hope that other plant sellers who haven’t already will consider following suit.If an ethically grown Stephania erecta enters the market we look forward to offering it in our shop again. But until then, let’s be mindful of where our house plants come from and remember that no plant collection or home aesthetic is worth damaging a plant’s natural habitat.

    Read more

    Plant Circle’s top 5 plants for your Office

    by Plant Circle

    Plant Circle’s top 5 plants for your Office

      In our humble opinion, any plant is better than no plants in your office! But even we must admit that there are some that are just more suitable for workspaces than others. In this post we explore which plant varieties would make the perfect additions to your (home) office, and why! ‘Why do I even need plants in the office?’, you may ask. Well, according to scientists, not only do they purify the air you breathe and improve the indoor air quality, but they also help you focus and increase your productivity.Additionally, looking at the color green makes you feel calmer and uplifts your mood!All pretty good reasons to have plants around while you’re working, if you ask us, and if you’re feeling convinced too, let’s take a look at the conditions that a plant needs to meet to be considered a great choice for the workspace. We think that the ideal candidate should be:• super easy to take care of• known for its air purifying qualities• visually pleasing, as a bonus! And it should however NOT:• require too frequent watering• require higher than average humidity Lucky for all of us, there are plenty of plants that meet all of those requirements, and we’ve gone ahead and made it super easy for you by compiling our choice for the top five plants for your workspace, that tick all the before mentioned boxes! 1. Zamioculcas Zamifoliia ‘Raven’A very interesting cousin of the more well known green variety, popularly known as the ZZ plant, will lure you in with its stunning, almost black foliage. Besides looking super interesting, this plant is known for being easy care… and we’re talking super easy!The only way to kill a ZZ plant is by watering it frequently, so just don’t do that and you should be fine! We suggest to water it only every 4-6 weeks and apart from maybe a windowless bathroom, you can pretty much place this plant anywhere you want, as it doesn’t have high expectations when it comes to light either.Just an easy care champion all around, but one that’s still sure to attract plenty of compliments from friends and coworkers! 2. Monstera DeliciosaUnbeatable when it comes to creating that #urbanjungle vibe we all love, the iconic foliage and avid growth of the Monstera are just some of the reasons why people continue to be obsessed with this classic.A Monstera Deliciosa will liven up any corner of your office, just don’t let it sit in complete darkness, or the sharp afternoon sun, as that can scorch the leaves.Just like the ZZ, it’s easy to take care for, but this one will appreciate weekly or bi-weekly watering depending on where it’s placed.In some countries Monsteras grow like weeds, which seems strange considering its status as a houseplant, but you literally can’t get rid of them if you plant them in your garden in warmer climates, so that should tell you something about how easy this plant actually is!Read more about Monstera care in this blog post. 3. Scindapsus PictusAlso known as silver pothos, Scindapsus Pictus is a perfect addition to your workspace and creates and instant lush and jungley vibe. This plant will do great on a shelf or in a plant hanger as it loves to trail. Not only is it super easy to care for, but it’s also known for its ability to remove toxins from indoor climates.We love the silver varieties, as they’re so unpretentiously beautiful and also grow like crazy! These plants are not fussy when it comes to light and will do well in medium to bright indirect light. Direct sun is the natural enemy of your Scindapsus, and will burn its leaves. Also don’t overdo it with the water, depending on the position simply water it every 1-2 weeks.Read more about Scindapsus care in this blog post.  4. Hoya Carnosa Krimson QueenHave a sunny office and don’t know what to grow there? Hoyas are your new best friends! We particularly love the Hoya Compacta Baby variety, as it gives you so much variation in color on the leaves! The colors can range from white to cream to hot pink, and an added bonus? Hoyas are succulents, and don’t like to drink often outside growing season AND they produce flowers that smell insanely good!Place your Hoya on a shelf, or in a hanging basket, and water it weekly in summer, and every 2-3 weeks in winter, provided its growing in a sunny window.Please keep in mind that Hoyas shouldn’t be repotted during flowering season, and that they like to grow pot bound in general. So basically just leave it alone. Easy!Read more about Hoya care in this blog post. 5. Sansevieria MetallicaOk, we know that snake plants may not be known for their stunning good looks, but the gorgeous Metallica variety definitely proves this assumption wrong!Not only is it proven by NASA that all Sansevierias can help if you suffer from migraines, but also they’re also famous for being super easy to care for. Just like Hoya, Sansevierias are succulents, which means they are not particularly big on drinking. We’re talking not even weekly in summer, once a month will do the trick. Besides that, they like to grow pot bound so you won’t need to repot it that often either.The perfect plant if you’re forgetful, or don’t stop by the office as often as you used to!

    Read more

    Plant Profile: Begonia

    by Plant Circle

    Plant Profile: Begonia

    With over 1800 species and countless hybrids, Begonias are a leafy wonderland of color, texture, and personality. Whether you're drawn to their dazzling foliage or curious about rare species like Begonia Luxurians, this guide dives into everything you need to know—from watering tips to winter care. Bonus: expert advice from rare plant growers on keeping your Begonias thriving, vibrant, and pest-free. Ready to fall in love with this botanical treasure? Let’s go!

    Read more

    Plant profile: Monstera Siltepecana

    by Plant Circle

    Plant profile: Monstera Siltepecana

    Let’s take a look at how to care for Monstera Siltepecana; the first Monstera we ever produced ourselves for Plant Circle! We think it’s the perfect plant for the beginners and collectors alike, and here is what we’ve learned about keeping it happy during the last couple of years. Monstera Siltepecana is a popular houseplant thanks to it being easy care and having attractive foliage. Endemic to Mexico and Central America, it’s renowned for the silver markings on its immature foliage.Like other Monstera species, Siltepecana is rather easy going and doesn’t demand too much attention from us. This plant however undergoes a considerably big transformation from the juvenile to the mature form, and like most Monstera species, it can develop fenestration on its leaves as it reaches maturity. In order to experience the transformation first hand, you must first ensure that the plant enjoys the most ideal conditions growing up! Soil. Plant your Monstera Siltepecana in an airy potting mix, either premade or one that you make yourself using bark, perlite and peat moss. Remember that a good potting mix will ensure healthy roots! Siltepecana cannot stand direct sunlight and should receive bright indirect light instead. It would enjoy a spot 1-1,5 meters away from a south facing window, or sitting directly on an east, north-east, north west ,or south east facing window. The afternoon sun of the west facing window could potentially scorch your Siltepecana, so be careful! Watering. We suggest keeping your Monstera on the dry side, meaning water only when the top 3 cm of soil have dried out and is dry to the touch. If you’d like to see your Monstera develop holes in the leaves, you’ll wanna provide above average humidity, and most importantly something to climb. It is crucial for the maturity of the plant to have something to climb on. Once you attach it to the moss pole, make sure to keep it moist. If you do not care about the leaves maturing and getting fenestrated you can also grow it in a hanging basket. A juvenile Monstera Siltepecana is also a great addition to a terrarium! Growth rate. Siltepecana is an extremely fast grower. From leaf spike to fully unfurled leaf it only needs a few days under ideal growing conditions, and under less ideal conditions it might take a few days longer… still pretty fast, if you ask us! We had observed some crazy fast growth on our plant that we keep in the greenhouse.  In just 6 months it went from a baby sized plant to a one meter tall lady, and it just gave us first fenestrated leaves.  Propagation. This plant is super easy to propagate in water from cuttings. Simply cut between two nodes. They’ll often produce small aerial roots, which means you can also use the air-layering technique. Take some moist moss and wrap around an aerial root, secure with foil, et voila! Give it a couple of weeks and you should see the aerial roots pushing some fresh white roots. Once the roots are long enough, we suggest over 5cm, cut it off and plant it in moss to develop further. You can also easily transfer it into water if you’re more comfortable with that method. Pests. Monstera Siltepecana is prone to getting thrips, however, we have noticed that with the use of a store bought pesticide, it’s not too hard to get rid of the pests.If the infestation is very bad, we suggest using propagation to save the plant.    

    Read more

    Plant profile: Scindapsus

    by Plant Circle

    Plant profile: Scindapsus

    In this plant profile we get into Scindapsus! Learn about where they’re from, how to care for them, and how to tell them apart! The Scindapsus is a popular genus, commonly known as ‘Satin Pothos’ or ‘Silver Pothos’, despite not actually being a Pothos at all! Not an Epipremnum, and not a Philodendron either, although sometimes mistaken for that too, Scindapsus belongs to the Araceae family, which is native to Southeast Asia, New Guinea, Queensland, and a few western Pacific islands.The most common Scindapsus species in cultivation today is the Scindapsus Pictus, followed by Scindapsus Treubii, which has only recently become more commonly available due to an increase in popularity. Scindapsus plants are highly decorative, climbing vines with thin stems and rooting at the nodes. These plants are some of the best selling plants that we carry here at Plant Circle, and with good reason; not only are they easy to care for, but they’re also absolutely beautiful, and most importantly, affordable… even the rare ones! Scindapsus Pictus was described in 1842 by German botanist Justus Carl Hasskarl. The name ‘Pictus’ comes from Greek and means ‘Painted’, and it’s not hard to understand why they decided to name it that! When young, this species is characterised by thick, velvety leaves, that are narrowly ovate with a heart-shaped, slightly asymmetric base. The leaves have a dark green color with silver-grey edges, and irregular spots of the same colour. In their mature form, the leaves become fully heart-shaped. Left image, clockwise from the top: Silver Princess, sp Sumatra, Silver Splash, Silver Splash, Silver PrincessRight image: Exotica, Silver Hero, Silver Hero, Silvery Ann, Argyraeus Some Scindapsus varieties have been on the market for a while, and are already in mass production, while others are more uncommon, or even rare. Scindapsus Treubii, for example, which is native to Jawa, Malaysia and Borneo, is a less common species of Scindapsus that has only entered the European market in very recent years. Scindapsus Treubii ‘Moonlight’ is the only species currently in commercial production in Europe, while ‘Dark Form’ is slowly making its way into European greenhouses.At the end of this post we have compiled a list, to the best of our abilities, of the different varieties of Scindapsus Pictus and Scindapsus Treubii, that we are familiar with, sorted by how common or rare they are. The list will be updated on regular basis as we become familiar with new varieties. But first, let’s get into some basic plant care for this surprisingly low maintenance genus! Growing tips. Although Scindapsus is a great plant to grow in hanging basket, and it’s tempting to just do that, if you want your plant to really achieve its full potential, and grow large sized leaves, try letting it climb something like a coco pole instead. The key here is providing the plant with a climbing surface made from organic matter. This allows the plant can grow its roots into the pole, and only then can the leaves can reach a truly impressive size! Humidity. Scindapsus prefer temperatures around 18-20 degrees, but when it comes to humidity, which is so often a problem for plant lovers in drier climates, this plant doesn’t require a lot of humidity, and can even thrive under more dry conditions, so you won’t need to invest in a humidifier because of this plant! Watering. Very basic; simply check with a finger and water the plant when top 3 cm of soil is dry, and let it dry out between waterings. This plant is very adept at communicating its needs, and its leaves will start to curl when it’s really thirsty! Soil. Scindapsus likes a porous, well draining substrate that is rich in organic substance, like our aroid potting mix! The faster growing species will need to be repotted frequently, but you can tell that it’s time when you see the roots growing out of the bottom of the pot. Light. The darker the Scindapsus, the less light it will need to survive, and while it prefers bright indirect sunlight, it can tolerate low light conditions. However, as with all plants, the less light it gets, the slower the growth will be! Note: Scindapsus Treubii tends to grow at a much slower rate than Scindapsus Pictus, who is considered an avid grower. Pests and problems. If you notice your Scindapsus growing very small leaves it usually means that it’s in need of something to climb, or that the light it’s receiving is insufficient. When you notice the edges of the leaves rolling inwards, it means the plant is dehydrated and needs water right away, or that it’s suffering from root rot, which also prevents it from drinking. Common pests include the usual suspects; thrips, fungus gnats, and spider mites.If you live with kids or pets, it’s important to remember that this plant is toxic if ingested! Propagation. These plants are easily propagated by stem cutting or air layering. Fun fact. Each variety of Scindapsus Pictus has the ability to suddenly produce a leaf that will look like another cultivar. We have come across ‘Silvery Ann’ producing ‘Argyraeus’ leaves, and ‘Silver Splash’ suddenly growing an ‘Exotica’ patterned leaf, so don’t say this genus isn’t full of surprises! Common types of Scindapsus Pictus (commercially produced): Scindapsus Pictus ‘Exotica’ Scindapsus Pictus ‘Argyraeus’ Scindapsus Pictus ‘Silvery Ann’ Uncommon types of Scindapsus Pictus: Scindapsus Pictus ‘Silver Hero/Platinum’ Scindapsus Pictus ‘Silver Splash/Silver Cloud’ Scindapsus Pictus ‘Silver Lady’ Scindapsus Pictus ‘Silver Princess’ Scindapsus Pictus ‘Jade Satin’ Rare types of Scindapsus Pictus: Scindapsus Pictus var ‘Argyraeus Dark Form’ Scindapsus Pictus ‘Jade Satin Variegated’ Common types of Scindapsus Treubii: Scindapsus Treubii ‘Moonlight’ Uncommon types of Scindapsus Treubii: Scindapsus Treubii ‘Dark Form’ Scindapsus Treubii Sp ‘Sumatra’ Rare types of Scindapsus Treubii: Scindapsus Treubii ‘Variegated’ Scindapsus Treubii ‘Mint’

    Read more