Quality Guaranteed

Across the EU

Free Shipping

60€ in Germany | 100€ Europe

Queer & Woman Owned

Founded 2017 in Berlin

chevron_left chevron_right

Filters

Clear all

Blog Themes

    common-pests-mealybugs_optimized

    by admin

    Common pests: Mealybugs

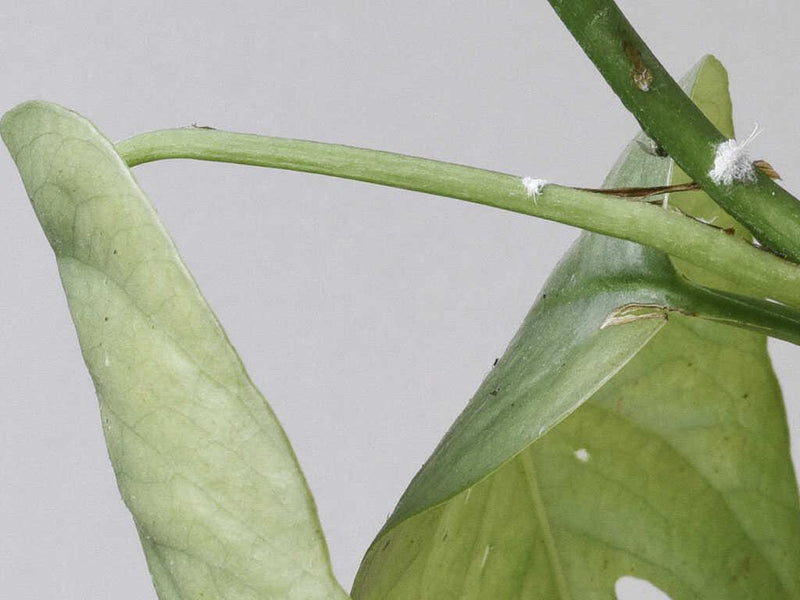
    Mealybugs- identification, treatment and prevention! Mealybugs are soft-bodied, wingless insects measuring about 2 mm long, that often appear as white, cottony masses on the leaves and stems of plants. Although occasionally mistaken for white plant fungus, mealybugs can be easier to spot and remove from your plants than other common pests, but do not underestimate them! While slowly moving across your plant, these guys will suck the juices out of your beloved plant, and while doing so, excrete a sticky, honeydew-like substance on the foliage, which sets the stage for the growth of sooty mold fungus, and can even attract other plant pests. Mealybugs like to stick together and hide in the most inaccessible parts of plants, such as leaf axils, leaf sheaths, between twining stems, and under loose bark. And if that wasn't bad enough, there are also some mealybug species that feed on plant roots, something that often happens to Hoyas. The regular kind, though, will lay up to 600 small, yellow eggs in a protective, cottony mass, and aside from the bugs themselves, that is what you'll most likely notice first on your the plant. Where do they come from? The most common way for mealybugs to make their way onto your plants is via something we all love... new plants! Especially tropical plants with softer stems and leaves are very likely to attract mealybugs, but more on that further down!Prevention is easier than treatment, so before we get into how to get rid of mealybugs, the first thing you should always remember, is to check your new plants for bugs when you bring them home!If you want to play it safe and really be one step ahead of pests, try quarantining your new plant right away, and giving it a preventative Neem oil treatment, before introducing it to the general population. This way, if your new plant was carrying some unwanted stowaways, they won't have a chance to spread to the rest of your home. Which plants are prone to mealybug infestations? With so many different mealybug species out there, no genus is safe! But plants like Orchids, African Violets, Begonia, Coleus, succulents, and amaryllis, are among the plants known to be especially susceptible to citrus mealybugs, while the long-tailed mealybug seem to have a preference for plants in the Dracaena genus.As we mentioned earlier, there are some species of mealybugs that live in plant soil, and attack the roots. Hoyas are particularly susceptible to those, and unfortunately, the only way to identify this type of mealybug, is by the damage they cause the plant. Look for yellowing leaves and a lack of new growth, and if you suspect there are mealybugs in the soil, the only way to get rid of them is to repot the plant and completely replace the soil. /wp:columns wp:block {"ref":71578} / wp:paragraph If you see any of the following symptoms: stunting, chlorosis, defoliation, or wilting, or if you've been able to spot actual mealybugs on your plants, it's time to start treatment immediately!Here are our best tips for quickly and efficiently getting rid of these highly unwanted house guests. If you see adult bugs or eggs, remove them immediately by wiping your plant off with a damp towel soaked in rubbing alcohol. Alternatively you can make a spray by mixing one part rubbing alcohol to seven parts water, and spraying it directly on plants affected by mealybugs. This also works on aphids, thrips, whiteflies, etc. The alcohol will melt the protective wax that covers certain insects, and dry out the soft body parts of others. Remember to check all of those inaccessible spots such as partially unfurled, new leaves! Should you find any bugs there, either spray them or use a q-tip with rubbing alcohol to remove them. Use predator bugs like the Cryptolaemus Montrouzieri. Also known as mealybug ladybird, or mealybug destroyer, this insect can be released onto your plants in order to control the mealybug population in a completely natural way. Be aware that the ladybirds larvae look a lot like large mealybugs! It's also good to remember that predator bugs are usually most successful when pest populations are fairly low. Our trusty, old friend Neem! Neem oil is an effective treatment for nearly every kind of pest that can infect your plants, so if using predator bugs is not your thing, and you don't have any alcohol at home, you can always start with a Neem treatment. Last but not least, it's important to remember that no matter which method you choose, the key to success is repetition, and reducing the risk of the infestation spreading. You accomplish that by quarantining the affected plant for at least four weeks, and checking the plant for the bugs regularly. Also, don't forget to fertilise your plant when it's suffering from pests, as they will stunt the plants growth, so your plant will need all the extra help it can get to recover and regrow!

    Read more

    Ferns: Are They Really So Hard to Grow?

    by Plant Circle

    Ferns: Are They Really So Hard to Grow?

    Have you ever found yourself grabbing a stunning silver blue fern or a bushy Boston fern at the store, only to put it back when you remember how many times you’ve accidentally killed your previous ferns? We’ve all been there. I can’t count on the fingers of both hands how many ferns I’ve brought home only to watch them wither away. However, after some trials and errors, I’ve figured out how to grow them successfully and even discovered which varieties are hardy and thrive on neglect. Here are my best tips and findings to help you care for your ferns. Watering You might have heard the famous advice: “Keep moist but not waterlogged.” But what does that really mean? Essentially, it means that when you touch the potting mix, it shouldn’t feel dry, but it also shouldn’t be muddy. Think of it as watering more often with small amounts of water rather than a lot of water once a week. Here are a few things to consider: Planter Type: Avoid terracotta pots as they absorb moisture and dry out the soil faster. Unless you enjoy daily plant care, opt for a plastic nursery pot placed inside a decorative planter. This setup helps maintain moisture levels. Drainage: Ensure your planter has proper drainage. If you overwater your fern, you’ll notice water sitting at the bottom of the planter. Ferns dislike “wet feet” (unlike some plants like Alocasia) and can develop root rot if left in standing water. Water Quality: Use distilled or filtered water, or even rainwater if possible. This helps avoid any issues with the chemicals present in tap water. Soil One crucial step for fern care is to repot your fern as soon as you bring it home. Most store-bought ferns are pot-bound, and upgrading their soil can make a big difference. Here’s how to handle it: Fern Potting Mix 5L Pre-Repotting Soak: Generously water the plant and let it soak to loosen the root ball, making repotting easier and ensuring that the roots are more pliable, reducing the risk of damage during the repotting process. Soil Choice: Since ferns like to stay moist, a good potting mix would be coco coir with perlite and some peat to lower pH. Coco coir is known to retain moisture for longer periods, making it an excellent choice for ferns. A quick Google search based on the specific fern you have will guide you to the best soil type. Light While ferns don’t like direct sunlight, they still need a good amount of light to thrive. Please don’t place your ferns in dark corners or windowless bathrooms. The more light they get (without direct sunlight), the better they’ll grow. Humidity If your bathroom happens to have a window, it will be a great spot for your fern as they love higher humidity. Otherwise, speaking from experience, I had no problems with ferns in my Berlin apartment with average humidity. Recommended Ferns for Beginners For those new to growing ferns, I recommend starting with these varieties: Bird’s Nest Fern: Hardy fern that doesn’t mind if you forget to water it occasionally. It’s broad, arching fronds can add a lush, tropical feel to any indoor space, making it an ideal houseplant for those looking to bring a touch of greenery into their home. This fern thrives in indirect light and can tolerate low-light conditions, making it perfect for rooms without much natural sunlight. Additionally, it can help purify the air, contributing to a healthier living environment. Just make sure to keep its soil slightly moist and avoid letting water sit in the crown, as this can cause rot. Crocodile Fern: Super easy to grow and possibly the hardest fern to kill—as long as you don’t overwater it! It tolerates drying out between waterings quite well. This unique fern, with its rugged, crocodile-like textured leaves, makes for an attractive indoor plant. Additionally, it thrives in indirect light and is exceptionally adaptable to various environments. Whether you’re a beginner or an experienced gardener, the Crocodile Fern is a delightful addition to your plant collection due to its resilience and low-maintenance nature. Boston Fern: This guy is definitely next level, but if you repot it and keep it far away from touch with enough space around it in a well-lit spot, it will grow like crazy! Additionally, it’s important to keep the soil consistently moist but not waterlogged, as Boston Ferns thrive in high humidity. Regular misting and placing a humidifier nearby can also aid its growth. Don’t forget to feed it with a balanced, water-soluble fertilizer every month during the growing season to ensure it receives all the necessary nutrients. With just a bit of care and attention, you’ll have a lush, thriving fern that adds a touch of natural beauty to any space. Asparagus Fern: Probably my favorite! This one definitely prefers regular watering and doesn’t like to be dry, but in my experience, it won’t die quickly if you ever water it a day late. Its delicate, feathery foliage adds a touch of elegance to any space, and it’s relatively forgiving when it comes to lighting conditions. Although it thrives in bright, indirect light, it can tolerate lower light levels, making it a versatile choice for various rooms in your home. Growing it near humidifier will help maintain its lush appearance and prevent the leaves from drying out, which is particularly helpful if you live in a dry climate or during colder months when indoor heating can reduce humidity levels. By following these tips, you can turn your home into a fern-friendly haven. Happy growing!Monika Like what you read? Why not sign up for our newsletter and never miss a blog post? Our Instagram is also a great place for plant care tips. Have a request about topics we should cover? Email monika@plantcircle.co with your suggestions! Disclaimer: This blog post is written from a well-lit Berlin apartment; please keep that in mind. If you live in a different part of the world, growing ferns at home might be easier or harder.  

    Read more

    Growing Your Plants from Plugs

    by Plant Circle

    Growing Your Plants from Plugs

    Are you looking to expand your houseplant collection without breaking the bank? Starting your plants from plugs might be the perfect solution. In this blog, we’ll explore what plant plugs are and why they are a cost-effective and sustainable way to grow your favorite plants. From understanding the innovative tissue culture propagation method to providing a step-by-step guide on how to pot and care for your plugs, we’ve got you covered. We have a large collection of plant plugs for you to check out! What Exactly is a Plug? A plant plug is a seedling that was started and grown in an individual cell filled with potting soil in a laboratory. This method, known as tissue culture propagation, involves growing plants from a small piece of plant tissue in a sterile environment. Tissue culture ensures that each plug is a genetic clone of the parent plant, free from diseases and pests. This method is highly efficient and sustainable because it produces a large number of uniform plants in a short period, using minimal resources. By optimizing growth conditions in the lab, tissue culture reduces the need for chemical treatments and water, making it a cost-effective and environmentally friendly way to propagate plants. Plugs provide a cost-effective way to jump-start your houseplant collection. These well-developed young plants with strong root systems are ready for potting up. Step-by-Step: What to Do with Your Plugs When They Arrive Prepare a Plastic Nursery Pot: Select a small pot, preferably around 8 cm in diameter. Using a bigger pot will require more soil, which can retain excess moisture and potentially cause root rot. It’s better to start with a smaller pot and gradually pot up as the plant grows. Typically, when the roots begin to grow out of the holes at the bottom, it’s time to pot up. Prepare an Appropriate Potting Mix: Choosing the right potting mix is crucial for the healthy growth of your plant plugs. You can either purchase a potting mix specifically tailored for the type of plants you are growing or create your own blend. A pre-made potting mix ensures that your plants receive the optimal balance of nutrients, drainage, and aeration needed for robust growth. These mixes are formulated to meet the specific needs of different plant varieties, making it easier for you to provide the best growing conditions. If you prefer a more customised approach, you can mix your own potting soil. Start with a good-quality base such as peat moss or coco coir for moisture retention, and add perlite or vermiculite to improve drainage and aeration. Incorporate organic matter like compost or worm castings to enhance nutrient content. Depending on your plant’s specific requirements, you might also add ingredients like sand, charcoal or bark. We offer a large selection of potting mixes and soil improvers to help you create the perfect blend. With the right potting mix, your plant plugs will have a better chances to thrive and grow into healthy, mature plants. Base Mix 5L 12 € Shop now Planting the Plug: Carefully take the plug out of its packaging. You’ll notice that the root ball is often surrounded by a mesh or net. Gently remove this covering, being cautious not to damage the delicate roots. This step is crucial as it allows the roots to expand freely into the new soil. Start by adding a layer of soil to the bottom of your plastic nursery pot. This initial layer will help elevate the plug to the correct level and ensure good contact between the roots and the new soil. Place the plug in the center of the pot. Hold it steady and begin filling the pot with soil. As you add soil, make sure to cover all the roots and fill in any gaps around the plug. This helps stabilize the plant and promotes healthy root growth. Once the pot is filled, gently pat down the soil around the plug. This ensures that the seedling is firmly in place and that there are no air pockets, which can hinder root development. The goal is to make the seedling stable and secure in its new environment. Water and Fertilize: Water your plant with a light fertilizer, ensuring that you follow the recommended dilution rates on the package for optimal growth and health of your plant, and always remember to avoid over-fertilizing to prevent any potential damage. Place the pot in a well-lit spot, avoiding direct sunlight, to ensure that the plant receives enough light for photosynthesis without the risk of leaf burn. Alocasia Frydek Plug Shop now Now, it’s time to watch your plant grow! With the right care, your plugs will thrive and soon become beautiful additions to your home. If you don’t want to wait to see your plants grow, we recommend exploring our large and extra-large plant categories. These mature plants provide instant greenery and beauty, allowing you to enjoy the full aesthetic of a well-developed plant right away.

    Read more

    How to overwinter your tubers

    by Plant Circle

    How to overwinter your tubers

    In this article new would like to explain how to, and whether you should, overwinter your tuber plants! Did you know that Caladium, Amorphophallus and Xanthosoma all grow from a tuber? And that after the plant dies back, you can remove that tuber from the soil and plant it back later? Plants that grow from tubers usually die back in winter for a resting period of 3-7 months. Technically you can leave the plant in the pot and carry on as usual, as we assume the temperatures in your apartment won’t go below zero, meaning the plant can survive the cold season unaffected. However, if you would like your plant to come back in spring bigger and better than before, read on! 1. Remove the tuber from the soil and clean it well, getting as much excess soil off as possible. 2. Let the tuber dry out for a few days. 3. Once it’s dry to touch, place it in a box with a lid, and fill the box with either wood shavings or shredded paper.  4. Place it in a cool and dark storage with the lid not fully closed so a bit of air comes in. If you’ve followed the above steps to overwinter your tubers, all you have to do now is check back on your tubers once in a while. Once you notice a growth tip, it’s time to plant it back! You can plant Caladiums indoors in March and outdoors when the temperature is above 20 degrees celsius. When planting your Amorphohallus again, make sure that you place the tuber deep under the soil as the roots grow from the above the tube. This is so the tuber can support that beautiful, long stalk! When planting your Caladiums, make sure that the tuber is facing rings up, as this is where the plant will grow from. The tuber should be about 3-4 cm deep and you’ll need to keep it above approximately 24 degrees celsius for it to sprout. Tubers should be kept in moist, but not soggy, soil to sprout. Once new growth appears they should be watered often enough to keep the soil evenly moist, but again, never soggy! More detailed information on Amorphophallus, and how to grow them, can be found here.Happy planting!

    Read more

    Piper Plants: Crystal Secrets

    by Plant Circle

    Piper Plants: Crystal Secrets

    Piper plants, specifically Piper Crocatum and Piper Ornatum, are fascinating additions to any plant enthusiast’s collection. These South American natives are known for their unique characteristics and vibrant foliage. In this blog post, we’ll explore two key aspects of caring for Piper plants: understanding Piper Crocatum crystals and differentiating between Piper Crocatum and Piper Ornatum. Caring for Piper Plants: Piper Crocatum and Piper Ornatum To ensure the health and vitality of your Piper plants, it’s important to follow some key care tips. Firstly, provide them with the right amount of light. Piper plants generally thrive in bright, indirect light, so placing them near a window with filtered sunlight is ideal. Avoid exposing them to direct sunlight, as it can scorch their leaves. Secondly, maintain proper moisture levels. Piper plants prefer slightly moist soil, but be cautious not to overwater them. Allow the top inch of soil to dry out before watering again. Additionally, misting the leaves occasionally can help increase humidity, which mimics their natural tropical environment. Lastly, consider fertilizing your Piper plants every two to four weeks during the growing season using a balanced houseplant fertilizer. This will provide them with the necessary nutrients for healthy growth. With these care tips in mind, you’ll be well on your way to fostering thriving and beautiful Piper plants. Piper Crocatum Crystals: Nature’s Ant Protection If you observe the back of a Piper Crocatum leaf, you’ll notice small clear crystals known as exudate. These crystals are completely natural and serve as a means for the plant to release excess sugars through tiny openings in the leaf tissues. Over time, the clear crystals will dry out and oxidize, leaving behind tiny black dots that can be easily rubbed off with your fingers. But what purpose do these crystals serve? It turns out that Piper Crocatum plants have a clever defense mechanism against pests. They secrete sugar crystals on the backs of their leaves, which attract ants. This creates a mutually beneficial partnership between the plant and the ants. The Piper plant provides food for the ants, and in return, the ants protect the plant from potential threats. It’s a remarkable example of nature’s ingenuity! If you notice an abundance of these crystals, it could indicate that your Piper Crocatum is receiving too much light. Excess light leads to increased sugar production through photosynthesis. By reducing the amount of light your plant receives to partial shade (about 8 hours of filtered light per day) and ensuring that the soil remains moist but not overly wet, you can help maintain a healthy balance for your Piper Crocatum. Piper Crocatum vs. Piper Ornatum: Unveiling Contrasting Beauties When it comes to distinguishing between Piper Crocatum and Piper Ornatum, the differences lie not only in their appearance but also beneath their leaves. While both species share South American origins and similar growth habits, there’s a captivating distinction to behold. Piper Crocatum boasts deep purple backsides, providing a stunning contrast to its vibrant yellow and green striped leaves. On the other hand, Piper Ornatum reveals pale green undersides that beautifully complement its lush, glossy green foliage. Moreover, Piper Ornatum delights with its enchanting pink-veined leaves that gracefully vine or climb up trellises or supports. These visual variations make both Piper Crocatum and Piper Ornatum unique and irresistible additions to any plant collection.

    Read more

    Plant profile: Monstera Siltepecana

    by Plant Circle

    Plant profile: Monstera Siltepecana

    Let’s take a look at how to care for Monstera Siltepecana; the first Monstera we ever produced ourselves for Plant Circle! We think it’s the perfect plant for the beginners and collectors alike, and here is what we’ve learned about keeping it happy during the last couple of years. Monstera Siltepecana is a popular houseplant thanks to it being easy care and having attractive foliage. Endemic to Mexico and Central America, it’s renowned for the silver markings on its immature foliage.Like other Monstera species, Siltepecana is rather easy going and doesn’t demand too much attention from us. This plant however undergoes a considerably big transformation from the juvenile to the mature form, and like most Monstera species, it can develop fenestration on its leaves as it reaches maturity. In order to experience the transformation first hand, you must first ensure that the plant enjoys the most ideal conditions growing up! Soil. Plant your Monstera Siltepecana in an airy potting mix, either premade or one that you make yourself using bark, perlite and peat moss. Remember that a good potting mix will ensure healthy roots! Siltepecana cannot stand direct sunlight and should receive bright indirect light instead. It would enjoy a spot 1-1,5 meters away from a south facing window, or sitting directly on an east, north-east, north west ,or south east facing window. The afternoon sun of the west facing window could potentially scorch your Siltepecana, so be careful! Watering. We suggest keeping your Monstera on the dry side, meaning water only when the top 3 cm of soil have dried out and is dry to the touch. If you’d like to see your Monstera develop holes in the leaves, you’ll wanna provide above average humidity, and most importantly something to climb. It is crucial for the maturity of the plant to have something to climb on. Once you attach it to the moss pole, make sure to keep it moist. If you do not care about the leaves maturing and getting fenestrated you can also grow it in a hanging basket. A juvenile Monstera Siltepecana is also a great addition to a terrarium! Growth rate. Siltepecana is an extremely fast grower. From leaf spike to fully unfurled leaf it only needs a few days under ideal growing conditions, and under less ideal conditions it might take a few days longer… still pretty fast, if you ask us! We had observed some crazy fast growth on our plant that we keep in the greenhouse.  In just 6 months it went from a baby sized plant to a one meter tall lady, and it just gave us first fenestrated leaves.  Propagation. This plant is super easy to propagate in water from cuttings. Simply cut between two nodes. They’ll often produce small aerial roots, which means you can also use the air-layering technique. Take some moist moss and wrap around an aerial root, secure with foil, et voila! Give it a couple of weeks and you should see the aerial roots pushing some fresh white roots. Once the roots are long enough, we suggest over 5cm, cut it off and plant it in moss to develop further. You can also easily transfer it into water if you’re more comfortable with that method. Pests. Monstera Siltepecana is prone to getting thrips, however, we have noticed that with the use of a store bought pesticide, it’s not too hard to get rid of the pests.If the infestation is very bad, we suggest using propagation to save the plant.    

    Read more

    Rooting for Growth: A Beginner’s Guide to Propagating Aroids from Cuttings

    by Plant Circle

    Rooting for Growth: A Beginner’s Guide to Propagating Aroids from Cuttings

      Welcome to the first volume of our propagation tips and techniques blog, where we will be discussing how to propagate aroid plants from cuttings that include nodes and aerial roots. Aroid plants, including Philodendron, Epipremnum, Syngonium, Scindapsus and Monstera, are popular houseplants that are easy to propagate from cuttings. When taking a cutting from an aroid plant, it’s important to include a node. A node is a small bump or ridge on the stem of the plant where the leaves, aerial roots, and new shoots grow from. Nodes are essential for propagation because they contain meristematic tissue, which is responsible for the growth and development of new roots and shoots.   Cuttings without a node and just a leaf will not be able to develop roots and grow into a new plant. This is because the cutting lacks the meristematic tissue found in the node that is responsible for root and shoot development. Therefore, it’s important to make sure the cutting includes a node. To take a cutting from an aroid plant, follow these simple steps: Choose a healthy plant.Select a healthy aroid plant with strong stems and no signs of disease or damage. Find a node.Locate a node on the stem of the plant, where the aerial roots or leaves are growing from. Make the cut.Use a sharp, clean pair of scissors or a knife to make a clean cut below the node. The cutting should be at least 3-4 inches long and include one or two nodes.   Place the cutting in water.Place the cutting in a jar or vase filled with clean, room-temperature water. Make sure the node is submerged in water, but the leaves are not. Change the water every few days to keep it clean and prevent bacteria from growing.   Wait for the roots to growAfter a few weeks, you should start to see roots growing from the node. Once the roots are strong and at least few centimetres long, the cutting is ready to be planted in soil. Better have longer roots than shorter so if you can wait longer, do it.   Plant the cutting in soil.Fill a small pot with potting mix and make a small hole in the center. Insert the cutting into the soil, making sure the node and roots are buried about few centimetres deep. The cutting needs to be stable and all roots need to be covered. Water the soil and place the pot in a bright, warm spot, but avoid direct sunlight. By following these simple steps, you can easily propagate aroid plants from cuttings with nodes and aerial roots. Propagating plants is a fun and easy way to expand your plant collection or share your love of plants with friends and family. Stay tuned for the next volume of our propagation tips and techniques blog, where we will discuss how to propagate another popular houseplant.

    Read more

    Roots of Success: Mastering the Art of Water Rooting Cuttings!

    by Plant Circle

    Roots of Success: Mastering the Art of Water Rooting Cuttings!

    As spring ushers in new life and vibrant greenery, many plant parents look forward to propagating their beloved plants through cuttings. Sharing these cuttings with friends is not only a great way to spread the joy of gardening but also allows us to multiply our plant collections without spending a fortune. One popular and relatively easy method of propagation is water rooting. In this blog post, we will explore the best practices for propagating plants through cuttings and successfully rooting them in water. Start with Clean and Disinfected Tools.Before embarking on your propagation journey, it’s essential to ensure that your tools are clean and ideally disinfected. Use sharp scissors or a knife to make clean cuts, as jagged or torn edges may hinder successful rooting. Allow the Cut to Heal Once you’ve taken a cutting, it’s crucial to let the wound heal before placing it in water. Freshly cut stems are prone to becoming mushy and rotting in water. Most plants require a few hours on the counter to heal the cut, while succulents or cacti may need a few days for the cut to callous over. Change the Water Regularly or Use Activated CharcoalTo prevent bacterial growth and maintain a healthy environment for rooting, remember to change the water in the container every few days. Alternatively, you can add a small amount of activated carbon pellets to the water, which helps keep it bacteria-free. Provide Light for Root DevelopmentChoose a glass container for your cuttings, allowing the roots to receive some light. Light exposure promotes photosynthesis, helping the cuttings develop stronger root systems. However, be mindful of excessive direct sunlight, as it can overheat the water and damage the delicate roots. Consider Rooting Hormone Although not always necessary, using a rooting hormone formulated for foliage application can boost the success rate of your water-rooted cuttings. Apply it according to the product instructions, as improper use can be counterproductive. Wait for a Strong Root Network Patience is key when propagating plants through cuttings. Wait until your cutting has developed a healthy network of roots before proceeding. Rushing the process could lead to transplant shock or the failure of the cutting to establish itself. Choose the Right Pot and Potting Mix When your cutting has developed sufficient roots, it’s time to transition it to soil. Select a small pot that provides stability for the cutting. Ensure that all the roots are covered with potting mix, but be cautious not to choose a pot that is too large, as excess soil can lead to overwatering and root rot. We have substrates (potting soils) for all types of plants. Provide Bright Indirect Light Place your newly potted cutting in an area with bright indirect light. This will allow the plant to photosynthesize and promote healthy growth. Avoid placing it in direct sunlight initially, as it may be too intense for the tender roots. Water and Fertilize with Care In the first few weeks, be mindful of watering your newly potted cutting. Overwatering can drown the young roots, while underwatering can lead to dehydration. Find the right balance and adjust your watering schedule based on the needs of the specific plant. Additionally, provide a balanced fertilizer to nourish the growing cutting but avoid over-fertilization, as it can cause root burn. Propagation through cuttings and water rooting is an exciting and rewarding way to expand your plant collection and share the joy of gardening with friends. By following these best practices, you can increase your chances of success and ensure the healthy establishment of your propagated plants. So, grab your disinfected tools, prepare your glass containers, and embark on a propagating adventure this spring. Happy propagating!

    Read more

    Why are my leaves not growing big in size?

    by Plant Circle

    Why are my leaves not growing big in size?

    Houseplants are a great addition to any home. They add color, life, and even help improve air quality! But what if you’ve noticed that your plant’s leaves aren’t growing in to their full potential? Here are some common reasons why this may be happening! Pests. Spider mites, scale insects, thrips and aphids. We’re sure you’re familiar with at least some of these, and they can all do great damage to your plant’s leaves! They can cause yellowing, curling, and even stunted growth, so if you suspect pests, it’s time to take a much closer look at your plant and its leaves for any signs of damage. If you do find pests, treat them promptly to prevent further damage. Not sure how? We have several posts about pest treatment under the category ‘common pests’! Over watering. Over watering your plants can cause roots to rot and limit the plant’s ability to absorb nutrients and water. This can cause yellowing, wilting, and stunted growth of leaves. Make sure to allow the soil to dry out between waterings and make sure your pot has adequate drainage to prevent over watering. Learn more about best watering practices in this post! Too much light. You can have too much of a good thing! Too much light can actually cause the leaves on your plant to yellow and become stunted. On the other hand, too little light can also be the cause of spindly growth and small leaves. Make sure your plant is getting the right amount of light for its species, and if necessary, adjust its placement to ensure it’s getting the right amount of light. Nutrition Deficiency. A lack of essential nutrients like nitrogen, phosphorus, and potassium can cause stunted growth and yellowing of leaves. If you suspect a nutrition deficiency, fertilize your plant with a balanced fertilizer and make sure it’s getting the nutrients it needs to grow. Root Bound. When a plant’s roots become too crowded in its pot, it can limit its ability to absorb nutrients and water, causing stunted growth. If you suspect your plant is root bound, it may be time to repot it into a larger pot with fresh soil. Read all about repotting (in winter) here! Needing something to climb. Some plant species, like climbing plants and vines, need support in order to grow to their full potential. If you have a climbing plant, make sure it has a sturdy support system to help it grow, like a moss pole or a hanging plant support! In conclusion, there are many reasons why your houseplant’s leaves may not be growing big in size. By understanding the common issues and taking steps to address them, you can help your plant reach its full potential and enjoy its beauty for years to come!

    Read more

    Why is my plant turning brown?

    by Plant Circle

    Why is my plant turning brown?

    Have you ever noticed your plant getting brown spots on its leaves? They can appear on the tips, edges, or randomly on the surface of a leaf. Although this is obviously not the worst thing that could happen to your plant, it’s not pleasant to look at either, and it could be an indicator that your plant is struggling with one of the issues listed below! Irregular watering. This is a very common issue that can cause brown tips on your plant’s leaves. Whenever your plant needs moisture, but water isn’t getting into the roots, it will pull moisture from the leaves, hence the dried tips. To fix this simply water your plant regularly, perhaps in shorter intervals. Wanna know learn more? Let us teach you how to water your plants once and for all! Variegated plants. Brown leaves on variegated plants is super common! Variegated plants are more sensitive to lack of water and light, and since the white parts of the leaves have no chlorophyll, they are highly sensitive to issues that will turn leaves brown. If your leaf is fully white, the chances of it surviving and not browning are close to zero, at least in your home environment. Variegated plants need a lot more light than their green counterparts, so if you love variegated plants, you might wanna invest in some grow lights. Variegated plants will also suffer greatly if you don’t provide them with regular watering or meet their required humidity levels. However, sometimes none of this will help, and the leaves will get brown spots anyway. It’s the cost of their beauty, and something we simply need to accept. Low humidity. Just like irregular watering, low humidity can cause the browning of the leaves, and on Calatheas in particular you’ll often see the edges of the leaves turning brown. An easy way to fix this is to group your Calatheas together, get a humidifier, or place them on a tray with water and pebbles on it. Tempting as it is, we do not recommend misting your plants, as it is a very short term solution that can even cause leaf fungus if the room does not have proper air circulation.  Sun burn. If you ever notice brown patches on the leaves in more central spots, it’s likely because your plant sat in the afternoon sun and got burnt. Unfortunately there is no remedy for this, your only option is to cut off the leaf if it bothers you, and of course move your plant away from direct sun exposure. This issue is very common in spring and summer, after we’ve been desperately moving our plants closer to the windows all winter, and we forget to move them back to their usual spots in spring… based on a true story that may or may not have happened to us! Hard water. Another very common reason for the edges and tips of your plant’s leaf to go brown is hard water. If you live in the place where it’s common knowledge that the water is hard, then you’ll need to switch to filtered water or rain water to water your plants. This is a very common problem with Calatheas but we have also seen it happen to other plants like Ficus and Anthurium. Brita filters work pretty well, but for Calatheas we suggest using distilled water only. Read more about hard water here!

    Read more

    Why is my plant yellowing?

    by Plant Circle

    Why is my plant yellowing?

    One of the most frustrating things for a plant parent is seeing yellowing leaves on one of our beloved plants. Sometimes we have to accept that this is what just happens to plants, but other times we’re able to make some small changes to ensure it doesn’t happen again. Read on to find out what the reasons for yellowing leaves are, and maybe how to prevent the next one! Nature. Older leaves turning yellow and eventually falling off the plant is part of the plant’s life cycle. If you see an old leaf beginning to turn yellow and die, simply pluck it off. Plants will always shed leaves as they grow, and not every yellowing leaf is cause for concern, especially if you know that you provide your plant with adequate light and water, and regularly check for pests.There can however be other reasons for yellowing leaves, so let’s go over those! Water issues. A common result of over watering, or even under watering, your plant is that the leaves start turning yellow. If you notice yellow leaves on your plant, first check whether the soil is crispy dry or still wet, and you’ll have an idea of which crime you’re guilty of… and you might wanna check out this blog post to make sure watering isn’t the cause of yellowing leaves in the future! Light. Seasonal changes in lighting, or moving your plant to a different position, might cause your plant’s leaves to turn yellow. As soon as there is inadequate light, meaning too little light for the plant to sustain its foliage, it will drop ‘excess’ leaves in order to survive. Once you notice your plant doing this, move it closer to light source or install a grow light. Usually only older leaves will be shed in this way, so if you see your plant shedding new leaves, it’s likely that something else bothering it, like for example over watering. Nutrient deficiency. If you have never fertilised your plant, or only do so sparingly, your plant might be lacking some important nutrients that could cause its leaves go yellow. After a while the plant’s soil becomes depleted of nutrition, and there’s no other way for the plant to get the crucial minerals than via fertilisers. Remember, fertilising is important throughout the year, not only in spring and summer. Please note that once a leaf goes yellow, there’s no going back to green! We know, it’s a sad truth to face, but the best way to treat yellow leaves is to just cut them off, as this will help your plant focus its energy on the new growth.

    Read more

    Why is my plant’s soil mouldy?

    by Plant Circle

    Why is my plant’s soil mouldy?

    … and other common soil issues! Plant issues often start with the soil, so to ensure that your plants are as healthy and thriving as possible, we’re gonna take a look at the most common soil related issues, and how to fix them! Poor potting mix can lead to a plethora of problems with your plants, but they can easily be avoided by switching to a quality potting mix. We cannot stress enough how important it is to repot your plants into something light and airy after purchasing them, and it doesn’t have to cost a fortune. In fact, you can improve any potting mix by simply adding perlite and orchid bark to it!Now, some soil issues can be difficult to spot, but most of them are actually quite obvious… if you know what to look for!Let’s take a look at some of the most common ones, and the solutions. Mouldy soil. The root problem here, no pun intended, is a poor potting mix that doesn’t dry out fast enough. Additionally, your plant could also be dealing with over watering, and possibly even poor air circulation in the room. If you ever spot this issue, we suggest repotting your plant into a better aerated potting mix immediately . You can improve the quality of any soil by adding perlite and orchid bark to the mix, so invest in those, as they will always come in handy and last you a long time!In our experience, this hack will work well for pretty much any plant besides cacti.  White stuff on top of your plant’s soil. The white stuff on your plants soil is a buildup of minerals and salts. This is a very common issue in countries where tap water is very hard. To keep this from happening, switch to softer water if you can, like distilled-, filtered-, or rain water. We also suggest removing the affected top layer of soil and replacing it with a fresh mix, as those salts are harmful to your plants. And lastly, give your plant a shower from time to time to wash it all down! Soil is too compact. This one of the most common soil issues, and a very serious problem that can cause a lot of damage to the roots of your plant. And to make matters worse, it’s not the easiest one to spot either!Compact soil doesn’t let water get through, so whenever you water your plant, the liquid flows around the dense substrate, but doesn’t penetrate it. This way, the roots of your plant actually don’t get any of the water you’re watering it with! So if you’ve been wondering why your plant is looking all droopy even right after you’ve just watered it, check the potting mix! The only way to fix this issue is to immediately change the potting mix to something more airy. Little flies around you plants. These little flies that resemble fruit flies are called fungus gnats. Although these guys are not harmful in their mature form, the larvae will feed on your plants roots, making this a potentially serious soil issue. But not to worry, we wrote a whole blog post on how to get rid of them, and you can read it here!

    Read more